In this article we will discuss about the Supplementary Essential variable for GTAW, SMAW, SAW and GMAW welding process as per ASME BPVC Section IX for qualifying a groove weld PQR (Procedure Qualification Record).
What is supplementary Essential Variable?
A supplementary essential variables are those variable in which change will affect the toughness property of Weld Metal, HAZ (heat-affected zone) and Base Material.
Supplementary essential variable become additional essential variable in situation where procedure qualification requires toughness testing.
When supplementary essential variable changed, additional PQR are required to support the change and the WPS must also be revised by amendment to the WPS.
Supplementary Essential variable have to be addressed Only when the construction code requires the WPS to be qualified with impact testing.
WPS that are already qualified by tension test and bend test can be upgraded for impact tested applications by welding a test coupon big enough to remove the impact specimen. Repeating tension and bend test is not necessary. (Refer QW-401.1 of BPVC ASME Section IX)
When supplementary essential variable was introduced by ASME?
The 1974 changes were great benefit to the code user…
In 1974 edition all those variable which affect the notch toughness properties of weldment are removed from essential variable and place them in a separate listing as supplementary essential variable, required only for notch toughness application.
Prior to 1974 edition of ASME Section IX, there were only essential variable and non-essential variable. The rules for notch toughness applications were simply essential variable for all application.
The subcommittee of ASME Section IX decided that there were very few notch toughness application and therefore notch toughness rules are separate from non-notch toughness jobs.
Supplementary essential Variable for SMAW, SAW, GMAW and GTAW welding processes.

QW-403.5 (Supplementary Essential)
WPS shall be qualified using one of the following:
a) the same base metal (including type or grade) to be used in production welding.
Welding procedure would only be qualified to weld the type and grade of material used during qualification. This is for material which are not listed in Table QW/QB-422
b) for ferrous materials, a base metal listed in the same P‐No. Group No. in Table QW/QB-422 as the base metal to be used in production welding.
P No. further divided into group no., each of which shows a different level of notch toughness.
Example- If PQR is qualified by using material P No.1 Group 1 to P No.1 Group.1 then it will only be qualified to weld P No.1 Group 1 to P No.1 Group 1 material when notch-toughness is the requirement.
When impact is not required for job then will allow to weld any group no. within same P No.
c) for nonferrous materials, a base metal listed with the same P‐Number UNS Number in Table QW/QB-422 as the base metal to be used in production welding.
For nonferrous base material P No. are further divided into different UNS no. (eg. UNS N06625, UNS N08825, UNS N10276) which shows the different level of notch toughness. If PQR is qualified on UNS 08825 to UNS 08825 then it will only be qualified to weld UNS 08825 to same base metal.
For ferrous materials a PQR shall be made for each P‐No. Group No. combination of base metals, even though PQR have been made for each of the two base metals welded to itself.
Example: If PQR is qualified with P No.1 Group 1 to itself, then it will only be qualified to weld P No.1 Group 1 to itself.
If, however, two or more PQR have the same essential and supplementary essential variables, except that the base metals are assigned to different Group No. within the same P‐No., then the combination of base metals is also qualified.
Example: If a PQR is exist with P No. 1 Group 1 to itself and another PQR exist with P No. 1 group 2 to itself by using the same essential and supplementary essential variable (except Group No.), the both PQR may be combined to support a single WPS and that WPS can be used to weld P No.1 group 1 to itself, P No.1 group 2 to itself and P No.1 Group 1 to P No.1 Group 2.
In addition, when base metals of two different Group No. within the same P-No. are qualified using a single test coupon, that coupon qualifies the welding of those two Group No. within the same P-No. to themselves as well as to each other using the variables qualified.
Example: If a PQR is qualified by using the P No.1 Group 1 material on one side and P No.1 Group 2 material on other side (If both side material HAZ is impact tested), then it will be qualified to weld P No.1 Group1 to itself, P No.1 Group 2 to itself and P No.1 Group 1 to P No. 1 Group 2.
QW-403.6: (T limits Toughness) Supplementary Essential
When Impact test required, Minimum base metal qualified thickness will be:
- Thickness of test coupon (T) or 16 mm (Whichever is less)
- If thickness of test coupon (T) is ≤ 6 mm then Minimum qualified thickness is. ½ T.
This variable does not apply when a WPS is qualified with a PWHT above the upper transformation temperature or when an austenitic or P-No. 10H (SA240 S31803 Duplex) material is solution annealed after welding.
The concern of thickness here is that as the thickness of the base metal decreases, so does the cooling rate of the base metal HAZ. Slower cooling rates may lead to a deterioration of the notch toughness, and Section IX is most concerned with this effect when the base metal is less than 16 mm. Hence, this supplementary essential variable requires that the minimum base metal thickness be limited to 16 mm. Additional impact property data from test coupons less than 16 mm thickness is necessary to support production welding components thinner than 16 mm.

QW-404.7 (Dia. of Electrode > 6 mm) Supplementary
- Larger electrode require high current & Section IX is concerned that the higher heat input of electrodes with diameters exceeding 6 mm may result in a reduction of notch toughness properties because of grain growth in HAZ. Therefore, this supplementary essential variable requires requalification when a WPS specifies an electrode with a diameter greater than 6 mm when the supporting PQR was conducted with electrodes less than 6 mm.
- This variable does not apply when a WPS is qualified with a PWHT above the upper transformation temperature or when an austenitic material is solution annealed after welding.
The effect of degradation of notch toughness is negated after PWHT above the upper transformation temperature and solution annealed.
QW-404.12 (ɸ Classification) Supplementary
a) A change in the filler metal classification within an SFA specification, or for a filler metal not covered by an SFA specification or a filler metal with a “G” suffix within an SFA specification, a change in the trade name of the filler metal.
b) QW-404.12 is a supplementary essential variable that represents a further restriction of the filler metal variable QW-404.4 when notch toughness testing is specified.
c) for carbon, low alloy, and stainless steel filler metals having the same minimum tensile strength and the same nominal chemical composition, a change from one low hydrogen coating type to another low hydrogen coating type (i.e., a change among EXX15, 16, or 18 or EXXX15, 16, or 17 classifications)
d) from one position‐usability designation to another for flux‐cored electrodes (i.e., a change from E70T‐1 to E71T‐1 or vice versa)
These rules reflect the fact that each electrode classification having different chemical compositions and therefore having different level of notch toughness, so change in electrode classification require requalification impact test is applicable.
QW-404.35 (Flux-Wire Class)-Supplementary
A change in the flux-wire classification or a change in either the electrode or flux trade name when the flux-wire combination is not classified to an SFA specification. Requalification is not required when a flux-wire combination conforms to an SFA specification and the change in classification is
(a) from one diffusible hydrogen level to another (e.g., a change from F7A2‐EA1‐A1‐H4 to F7A2‐EA1‐A1‐H16), or
(b) to a larger number in the indicator for toughness, indicating classification at a lower toughness testing temperature (e.g. , a change from F7A2‐EM12K to F7A4‐EM12K)

Interpass temperature: the highest temperature in the weld joint immediately prior to welding, or in the case of multiple pass welds, the highest temperature in the section of the previously deposited weld metal, immediately before the next pass is started.
QW-406.3 An increase of more than 100°F (55°C) in the maximum interpass temperature recorded on the PQR.
Increase in interpass temperature result in slow cooling rate of HAZ (between 800°C to 500°C, t8/5) and promotes coarser grain. As coarse gain having less number of grain number of grain boundaries, therefore its strength is less and leads to notch toughness deterioration.
This variable does not apply when a WPS is qualified with a PWHT above the upper transformation temperature or when an austenitic or P-No. 10H material is solution annealed after welding.
As observed that after PWHT above the upper transformation temperature and solution annealed restore the notch-toughness properties. There in this case increase in interpass temperature is not considered as supplementary essential variable.

QW-407.2
A change in the PWHT temperature and time range is supplementary essential variable
- The PQR shall be subjected to PWHT essentially equivalent to that encountered in the fabrication of production welds, including at least 80% of the aggregate times at temperature(s). The PWHT total time(s) at temperature(s) may be applied in one heating cycle.
Interpretation No.- IX-07-06
Background: A weld test coupon for a PQR was welded to itself using P-No. 1, Group 2 plate material and postweld heat treated at 600°C to 610°C for 10 hr. The PQR documents all supplementary essential variable notch-toughness requirements. Notch toughness is required and all qualification ranges are supported by the PQR for production welds.
Question: Will this PQR support a WPS that specifies a PWHT temperature range below the lower transformation temperature, provided the time at temperature does not exceed 12.5 hr?
Reply: Yes.

QW-409.1 An increase in heat input, or an increase in volume of weld metal deposited per unit length of weld, for each process recorded on the PQR.

Increase in heat input degrades the notch-toughness of the HAZ because of the grain growth due to slower cooling rate.
For complete guide on heat input calculation please visit out other post : Heat input importance and calculation
The requirement for measuring the heat input does not apply when the WPS is qualified with a PWHT above the upper transformation temperature or when an austenitic or P-No. 10H material is solution annealed after welding.
The application of Post weld solution heat treatment would homogenize the microstructure, refining the coarse grain HAZ.
QW-409.4 A change from AC to DC, or vice versa; and in DC welding, a change from electrode negative (straight polarity) to electrode positive (reverse polarity), or vice versa.
This variable is necessary for the PQR qualification where impact test is required because the type of current and polarity have direct effect on the amount of heat induced to the job or workpiece. In DCEN 70% of the heat is transfer to the work piece and in DCEP 30% of the heat is transfer to the work piece and therefore having effect in notch-toughness properties.

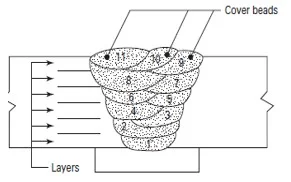
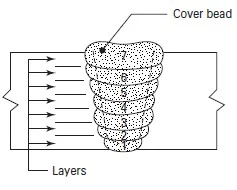
QW-410.9 A change from multipass per side to single pass per side. This variable does not apply when a WPS is qualified with a PWHT above the upper transformation temperature or when an austenitic or P-No. 10H material is solution annealed after welding. (Related ASME Interpretation: IX-13-12)
Layer: a stratum of weld metal consisting of one or more beads.


Please write and comments to us in case of any doubt. We will feel very happy to solve your queries…

As per sec IX, pqt on plate is also qualify pipe a, is it applicable where notch toughness is required? . Doubt is toughness property is may differ during plate welding and pipe welding
As per section IX if you qualify a PQR on plate it will qualify for pipe also even if notch toughness is applicable.
All supplementary variables applicable as per section ix for notch toughness are defined in this article.
Good information about supplementary information.
Well gathered, compiled and presented.
if supplymentry test is required for pqr then taking base metal thickness same is necessary ?
No, As per ASME Section IX